CARDIOSCAN QUICK GUIDE
RZ153+ SERIES CARDIO ID+â„¢ RECORDER SETUP
If you or your practice has any additional questions or would like to schedule a product demonstration, please contact us at 713-796-1129 or via email at support@holterscanning.com.
|
Programming a New Patient
- Insert a Fresh AA Alkaline Battery.
- Insert the CompactFlash Card into the recorder.
- (The Card will automatically be erased.)
- Insure that the Patient Cable is attached.
- Hit any button; the Following screen will appear.
|

|
- The “Patient†screen will soon appear.
|
 |
- To navigate the “Function†button, press the
 , ,
 , ,
 , and , and
 arrows on the key to move the cursor to the correct location and the arrows on the key to move the cursor to the correct location and the
 (Enter) button to select that item. (Enter) button to select that item. - Use the
and
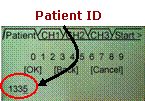
arrows to go to the proper numbers for the Patient ID and
(Enter) to select.
- Use the arrow and go to the second line of text to go to “Back†(to change a number) or to “OK†to finish entering the Patient ID.
NOTE: You cannot move on without a Patient ID!
|

 |
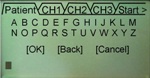
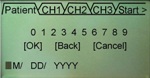
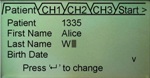
- Enter “Name, DOB, and Clinic ID†if desired.
|
 |
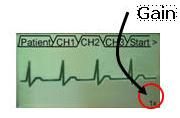
- Push the arrow to change the active Tab (screen) to “CH1†to view the ECG. (This is where you check the Hookup and change the gain. The Gain will be set for ALL 3 Channels.)
- Moving to the “CH1†Tab will display the Patient’s ECG for Channel 1. Likewise, CH2 and CH3 will display ECG Channels 2 and 3.
- The and arrows will increase or decrease the gain for all channels.
|
 |
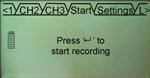
- Push the arrow to change the active Tab (screen) to “Startâ€.
- Pressing the (Enter) button at the Start Tab will begin the Holter recording.
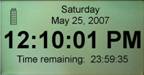
- During recording, the Cardio ID+ displays the current time, time remaining to the end of test and a battery-life indicator.
|
 |
Changing the Cardio ID+ Settings
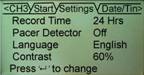
- To change the Recorder Settings, use the arrow to change the active Tab (screen) to “Settingsâ€.
- The
,
,
, and
arrows move the cursor to the correct location and the
(Enter) button selecs that item.
- The “Time / Date†are set in the same way.
- Languages are selected with the and buttons.
|
 |
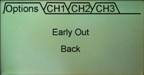
Early Out Procedure:
- The Cardio ID+ supports an “Early-Out†feature that allows you to stop a recording before the end of the selected recording time (24 or 48 Hours).
- To initiate an Early-Out hold the on the Function button and the (Enter) button simultaneously.
- You may end the test or view the Patient’s ECG.
- Use the and buttons to select the ECG Chan.
Warning:
- Failure to follow the procedure above may result in the loss of all recorded Patient ECG (Holter) data.
- The default for Pacemaker Detection is OFF. You must turn it on for every Pacemaker Patient.
- The default for Record Time is 24 Hours. You must set it to 48 Hours for every 2-Day Test.
|

|
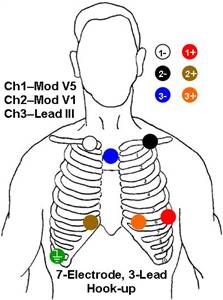
Patient Electrode Hookup:
|
|
 |
|
